2.5D Terrain
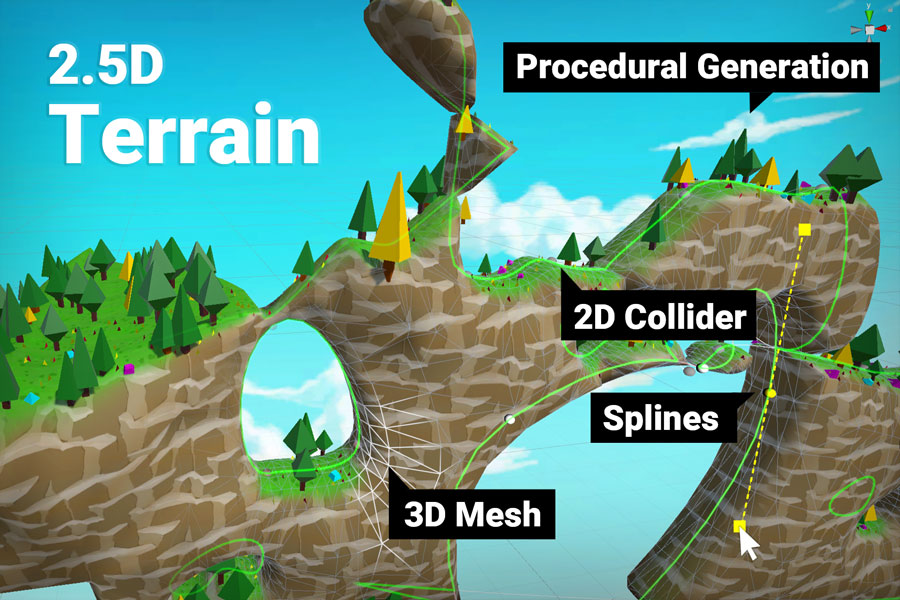
- Use 2D curves to generate a 2.5D terrain.
Generate 3D meshes and 2D colliders with ease combining multiple bezier curves. Think of it as an enhanced Sprite Shape Controller with the ability to generate 3D meshes. - Supports holes and merging of curves.
Use multiple curves and combine them with boolen operations (add, substract) to punch holes into your terrain or merge curves. - Live Preview (experimental)
The auto update mode can generate meshes while your are editing them. - Procedural foliage generator (experimental)
Add your prefabs to a list and let the foliage generator place the objects for you on the terrain. Useful for things like grass, trees, rocks, flowers, ... . - TriPlanar ShaderGraph shader included
- Full source code included.
I am a developer too and I don't like closed source assets. - Compatible with Unity Unity 2019 LTS, 2020 LTS, 2021 LTS, 2022, ...
Take a look
A time lapse of someone using an early version of the tool*.
*The shown art assets are not included in the package.
Support
If you find any errors then please use the support form, write to office[at]kamgam.com
Please be patient, replies may take a few days. Please include your Asset Store Order Nr in your request.
Thank you.
Installation
Download the Asset from the Asset Store and import it into your project. You are done, no additional setup is needed.
Usage
A new menu called "2.5D Terrain" will be available under "Tools" in the main menu bar. Go check it out once the import is done.
Use "GameObject > Create 2.5D Terrain" from the menu or in the Hierarchy to create a new terrain.
Info: the asset files will be copied into /Assets/Plugins/Terrain25D. The settings file will be created under Assets.
Settings
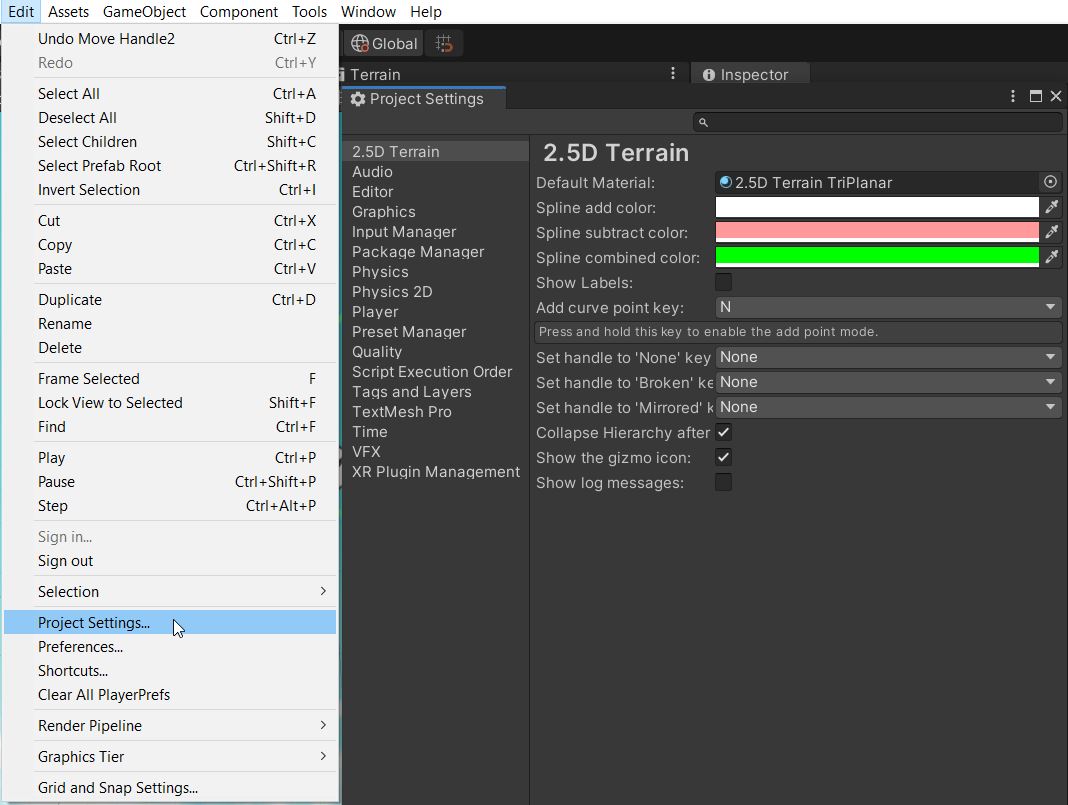
You can find the settings file (named "2.5DTerrainSettings") through the main menu (Tools > 2.5D Terrain Settings) or under Edit > Project Settings > 2.5D Terrain.
Manual
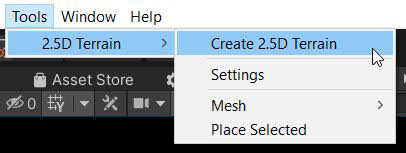
How to create a new 2.5D Terrain?
Tools > 2.5D Terrain > Create 2.5D Terrain
Overview
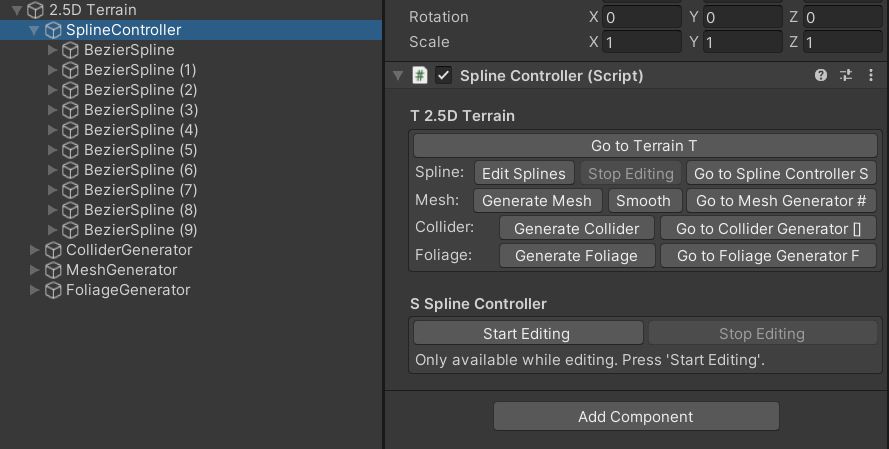
Each 2.5D Terrain object contains four parts as child objects:
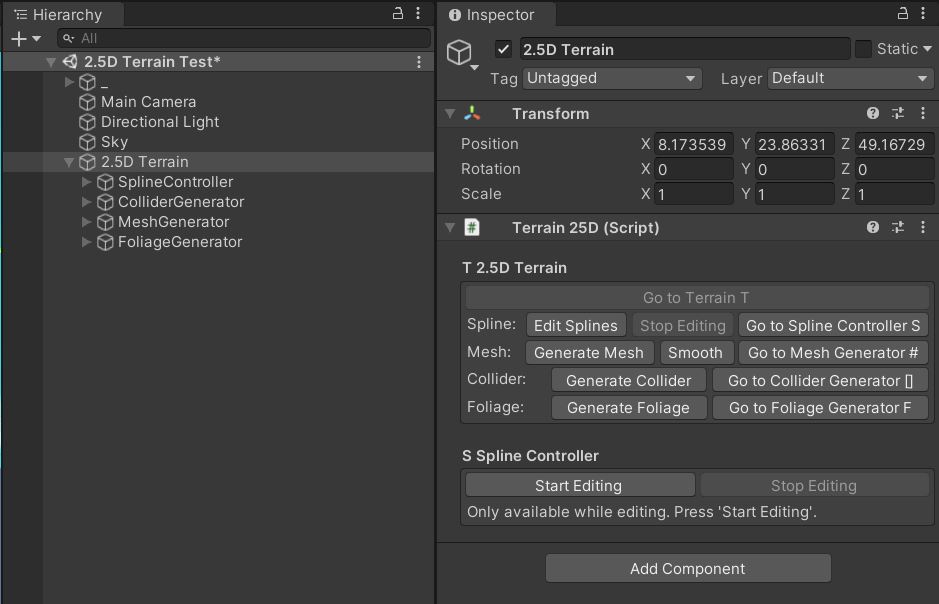
- Spline Controller
This is the base for all other parts. It is used to create and modify the curves. - Collider Generator
This creates a PolygonCollider2D from the shape output of the Spline Controller. - Mesh Generator
This creates a 3D mesh from the shape output of the Spline Controller. - Foliage Generator
This spawns Prefabs all over the generated mesh from the Mesh Generator.
Each of these children contains its own generated results. The Collider Generator contains the created PolygonCollider2D, the Mesh Generator the generate meshes, ... .
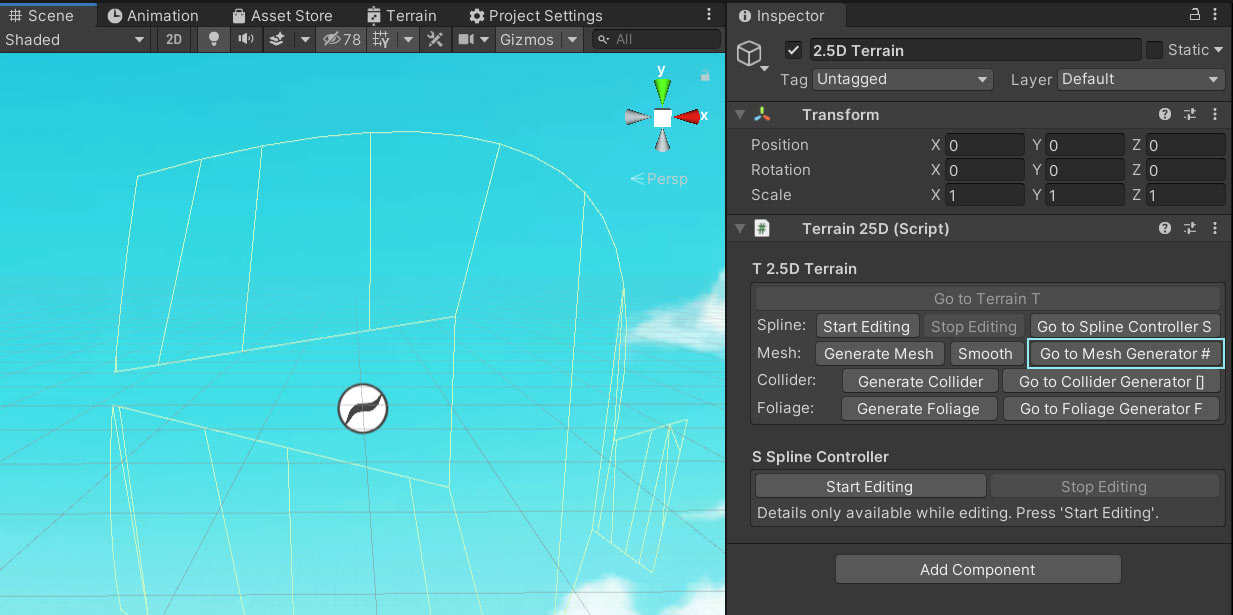
The Terrain2.5D object itself is mostly an empty shell. It does not do much except showing some utility buttons in the inspector.
You can remove the Collider Generator, the Mesh Generator or the Foliage Generator at any time. If a child is removed the tool will simply skip it. For example: No Collider Generator means no PolygonCollider2D will be generated.
Here are the dependecies:
Collider Generator < requires < Spline Controller
Mesh Generator < requires < Spline Controller
Foliage Generator < requires < Mesh Generator < requires < Spline Controller
Spline Controller
The Spline Controller contains one or more Bezier Spline curves. The Collider Generator and the Mesh Generator both depend on the Spline Controllers output. Do not delete it.
Step by Step Guide
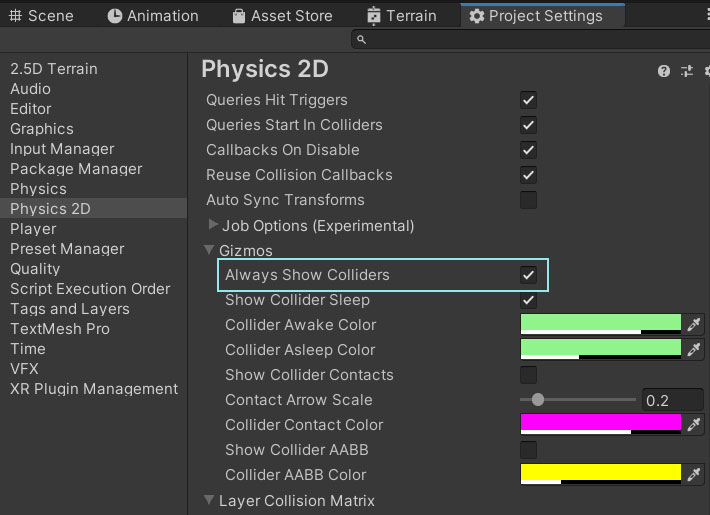
If you haven't already it might be a good idea to enable the display of the 2D colliders.
You can do this under:
Edit > Project Settings > Physics 2D > Gizmos > Always Show Colliders
To avoid accidental changes to your curves the Spline EditMode is disabled by default. To start editing curves press the "Start Editing" button either on the Spline Controller or the Terrain 2.5D. Both buttons do the same.
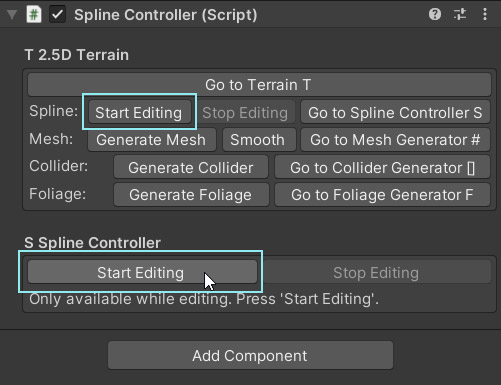 Once you are done with editing your curves press "Stop Editing".
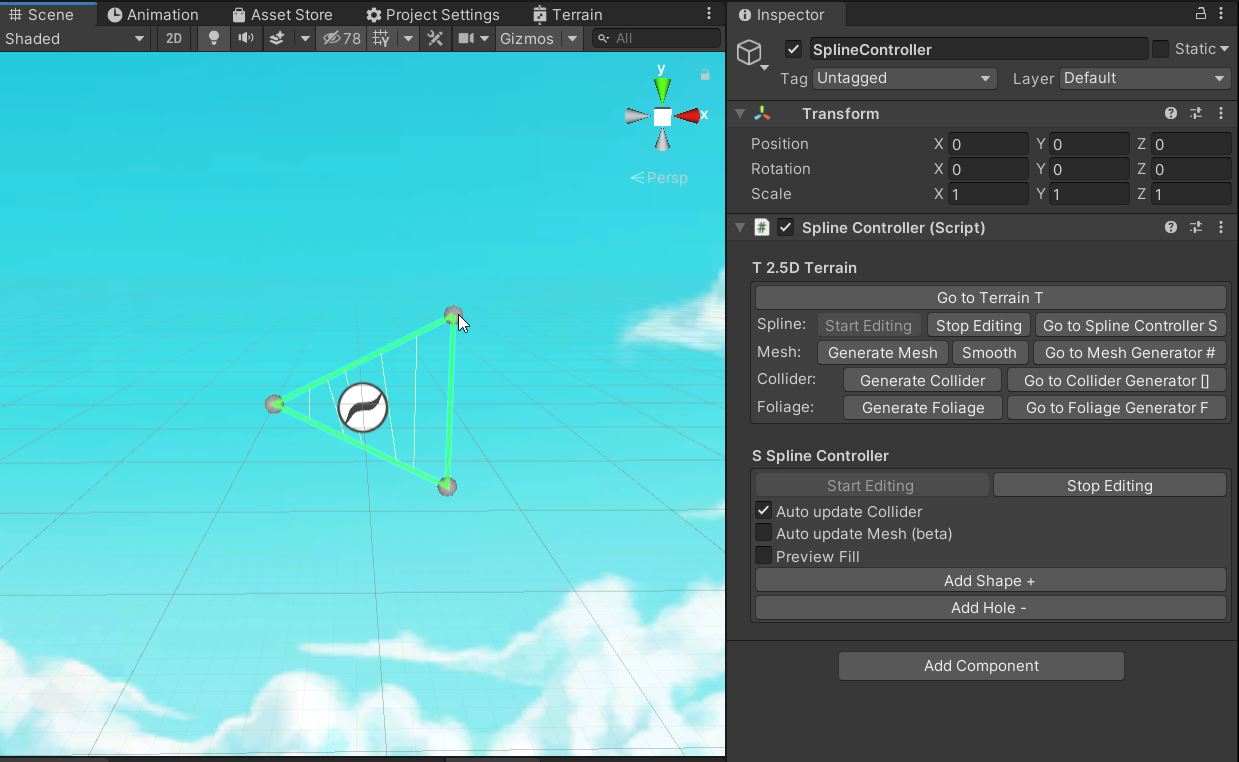
Once you are in edit mode you will notice that the curves are now visible in the scene view.
By default each curve has three points. Click on one of the grey control points to start editing the this curve.
 In the inspector you can see some options for the Spline Controller. If you hover your mouse over an option a tooltip will appear with a (hopefully helpful) description.
Should you need more info about one of the options in the inspector then please post your question in the Unity Forum. This way others can also learn from the discussion.
The points on the currently selected will turn white, indicating you are now editing it.
The currently selected control point(s) are marked with yellow color in the scene view. You can drag them around to change the position.
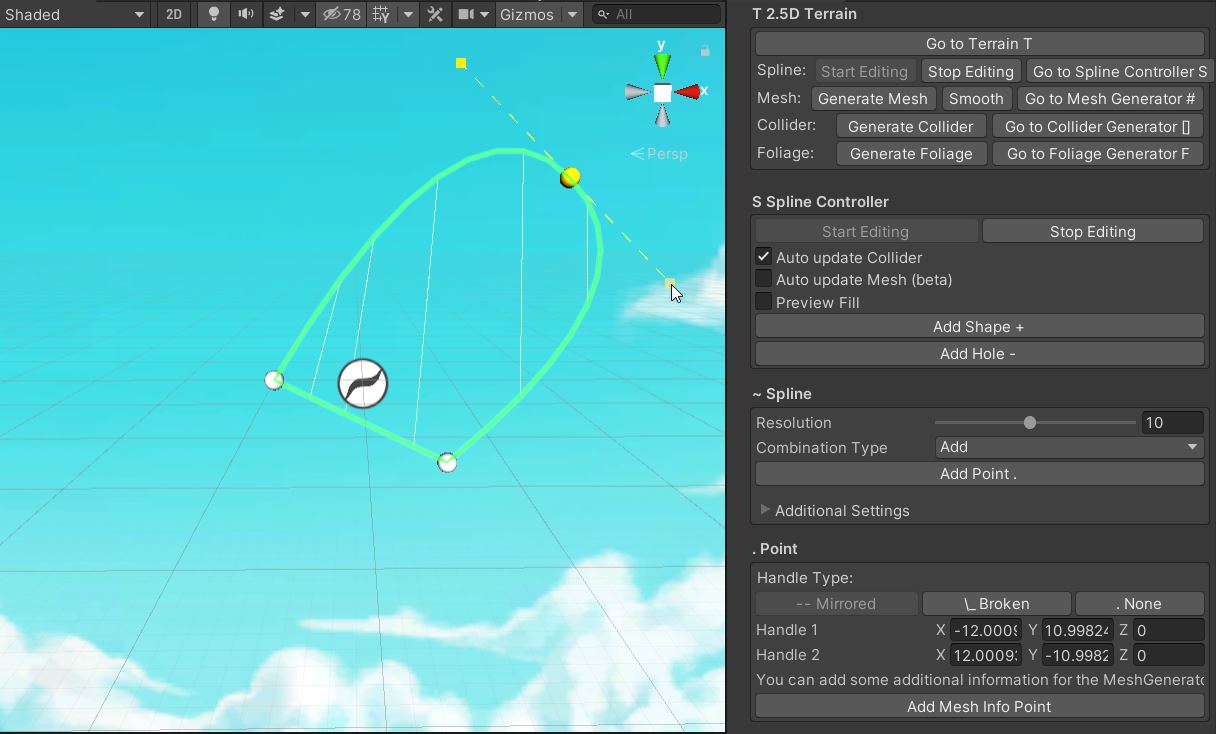
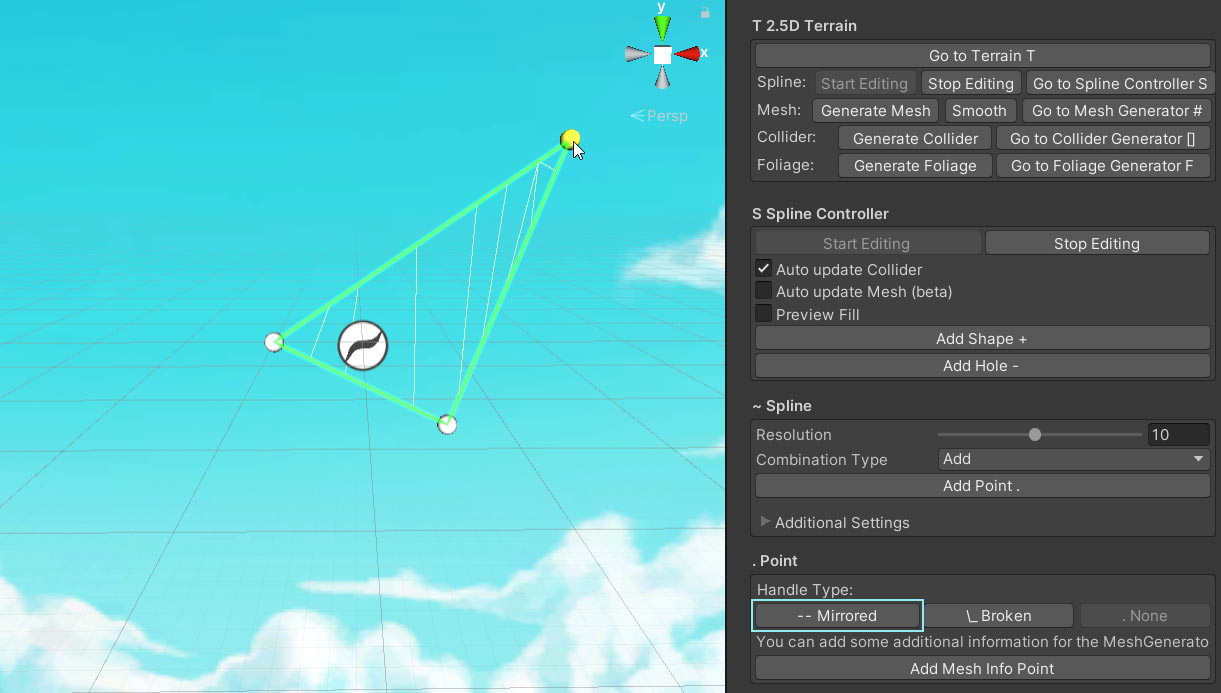 In the inspector you can see some options for the currently selected control point. Try changing the handle type to "mirrored" for example.
There are three handle types for each point "Mirrored", "Broken" or "None". None is the default which means no handles will be shown.
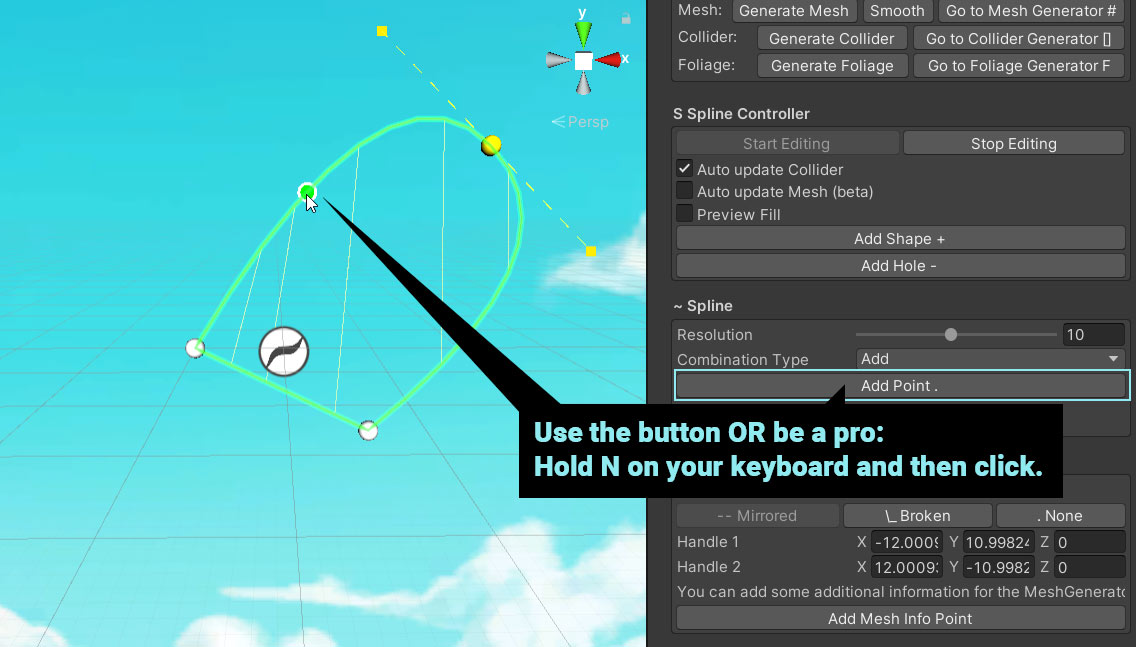
Now that you have mastered the handles let's add a new point to the curve.
You can do that by using the "Add Point" button. But honestly, that sucks.
The better way is to press and hold 'N' on your keyboard and then move your mouse over the curve. You will see a green dot moving along. If you click it then a new point will be added right there.
You can change the key at any time in the settings. I used to use SPACE for that, until Unity came along and took it from me.
 You may have noticed that the collider got updated along with the curve automatically. That's because the 'Auto Update Collider' checkbox is ticked by default.
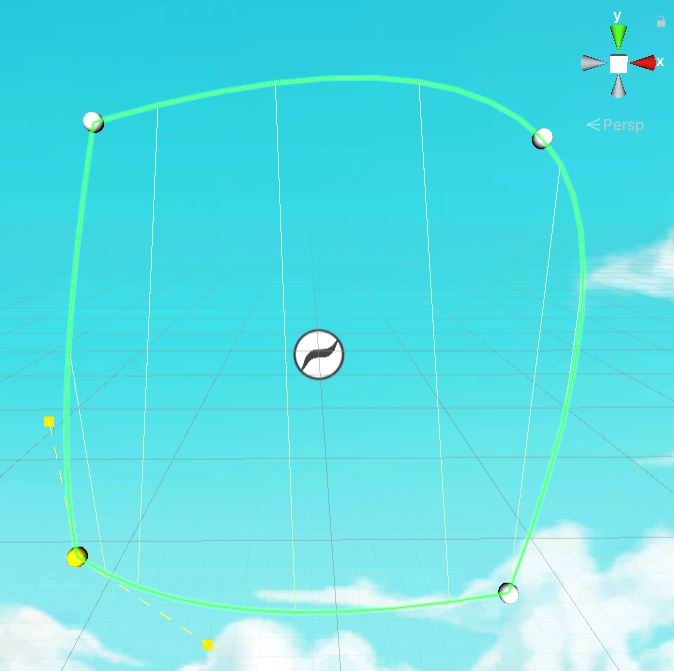
Play around wit the handle type and try to make a square-ish shape. Like this:
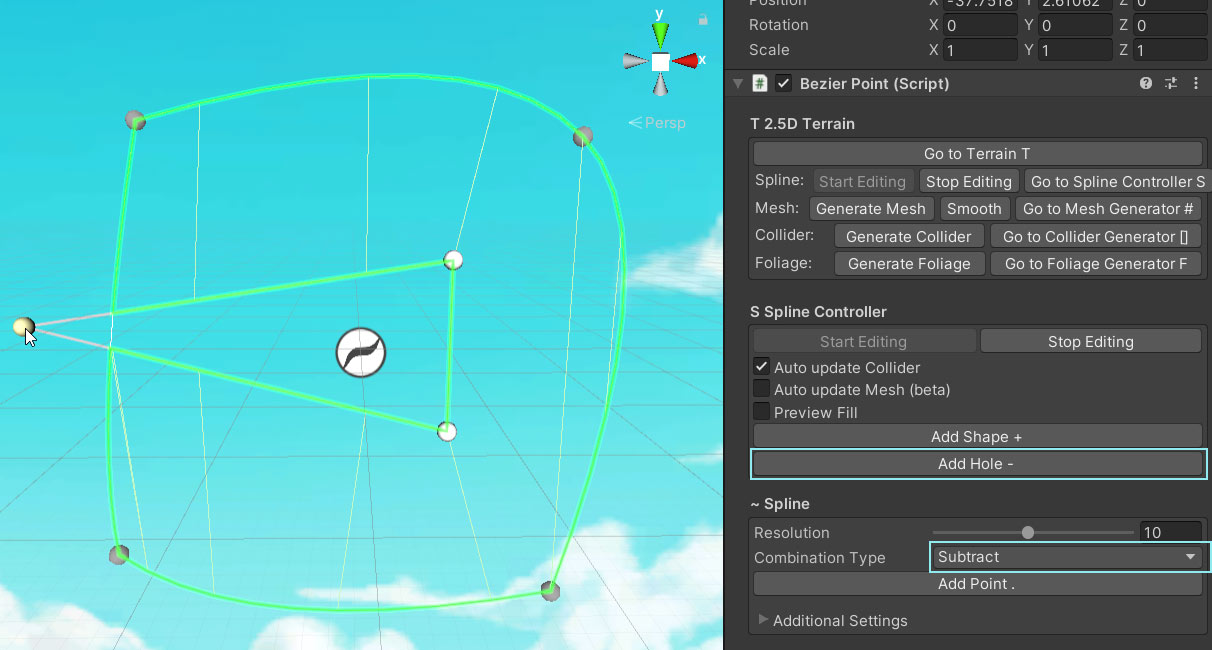
So far we have only used one curve. Let's add another. And to make it more fun, let's make it a hole. Press the "Add Hole" button to add a 'subtractive' shape.
If you drag the left point out of the surrounding curve you will see that the big green border suddenly opens up. The green border is a preview of the final result once all your curved shapes are combined. The Mesh Generator and the Collider Generator will create their results based on this green outline.
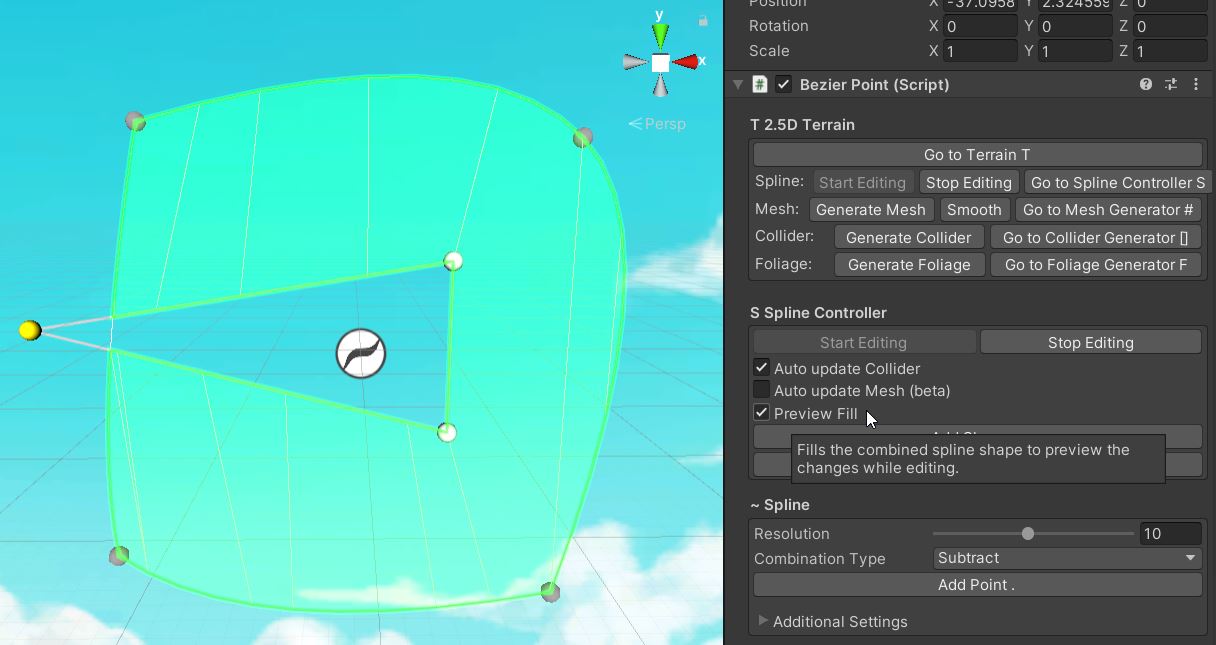
 To make it even more visible you can enable the 'Preview Fill' option of the Spline Controller. Though I'd recommend not using it all the time as it costs a bit of performance.
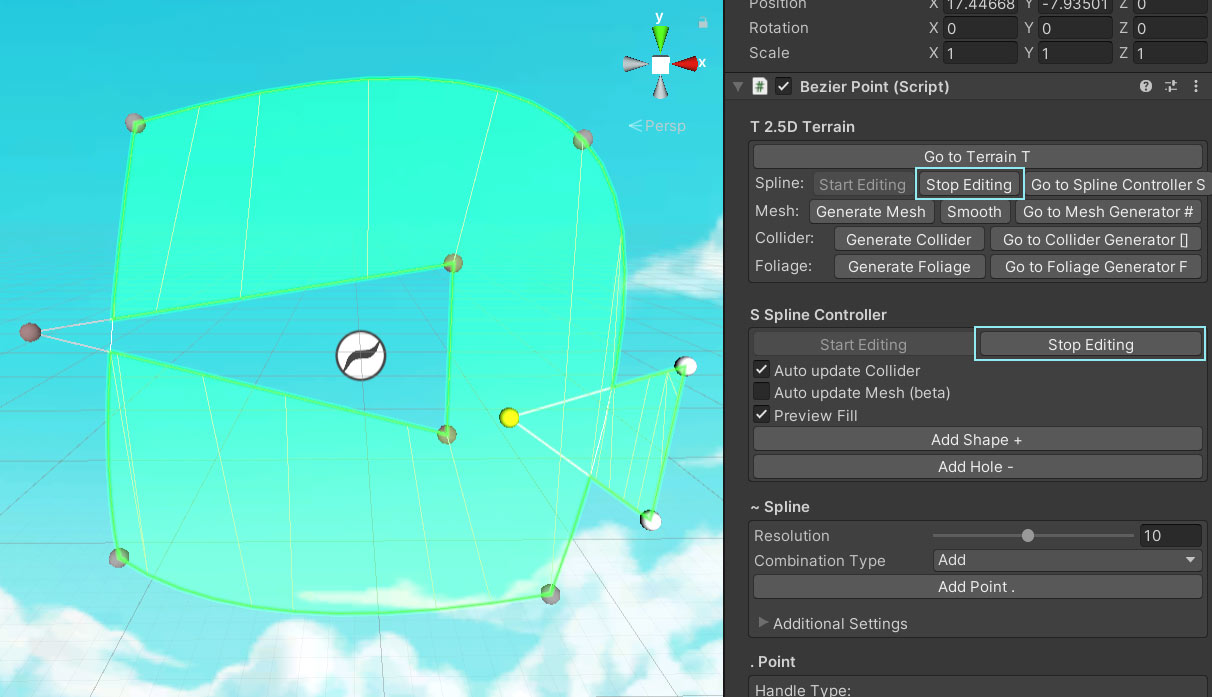
Once you are done. Stop editing the splines.
It's not strictly necessary to stop editing a spline before continuing working on other parts but I'd recommend it for performance reasons. The Editor is just a bit slower with all these splines being calculated and drawn all the time.
 Now you are ready for the Mesh Generator guide.
Collider Generator
The Collider Generator takes the output of the Spline Controller and generates a PolygonCollider2D from it. That's it.
Mesh Generator
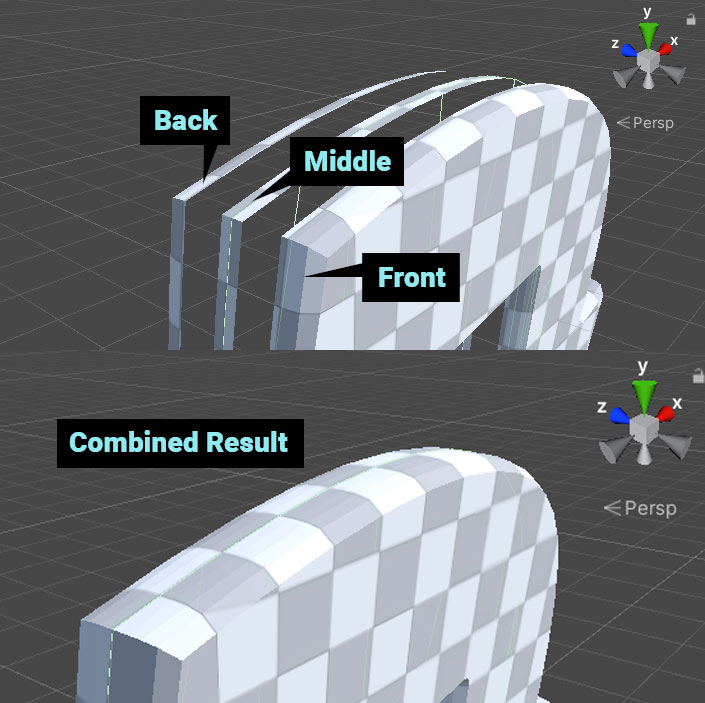
The Mesh Generator takes the output of the Spline Controller and generates (surprise) a 3D mesh from it. If you are familiar with 3D modelling then it's a bit like extrusion along both directions of the z-axis.
The generated mesh consists of three parts: the Front, the Middle and the Back ordered along the z-axis. These parts are generated and then combined into one mesh (you can also keep them separate if need be).
Step by Step Guide
This guide assumes you have completed the 'Spline Controller' guide first.
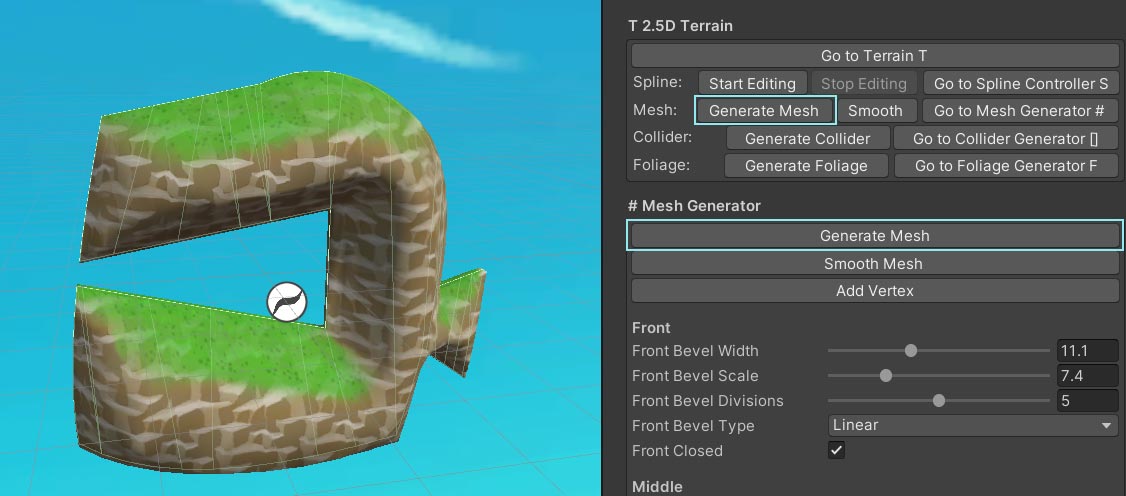
To open the Mesh Generator select the 2.5D Terrain and hit 'Go to Mesh Generator'.
To generate the mesh press the 'Generate Mesh' button.
To make it easier to see what each option of the Mesh Generator does I'd recommend to rotate the scene view a bit, like this:
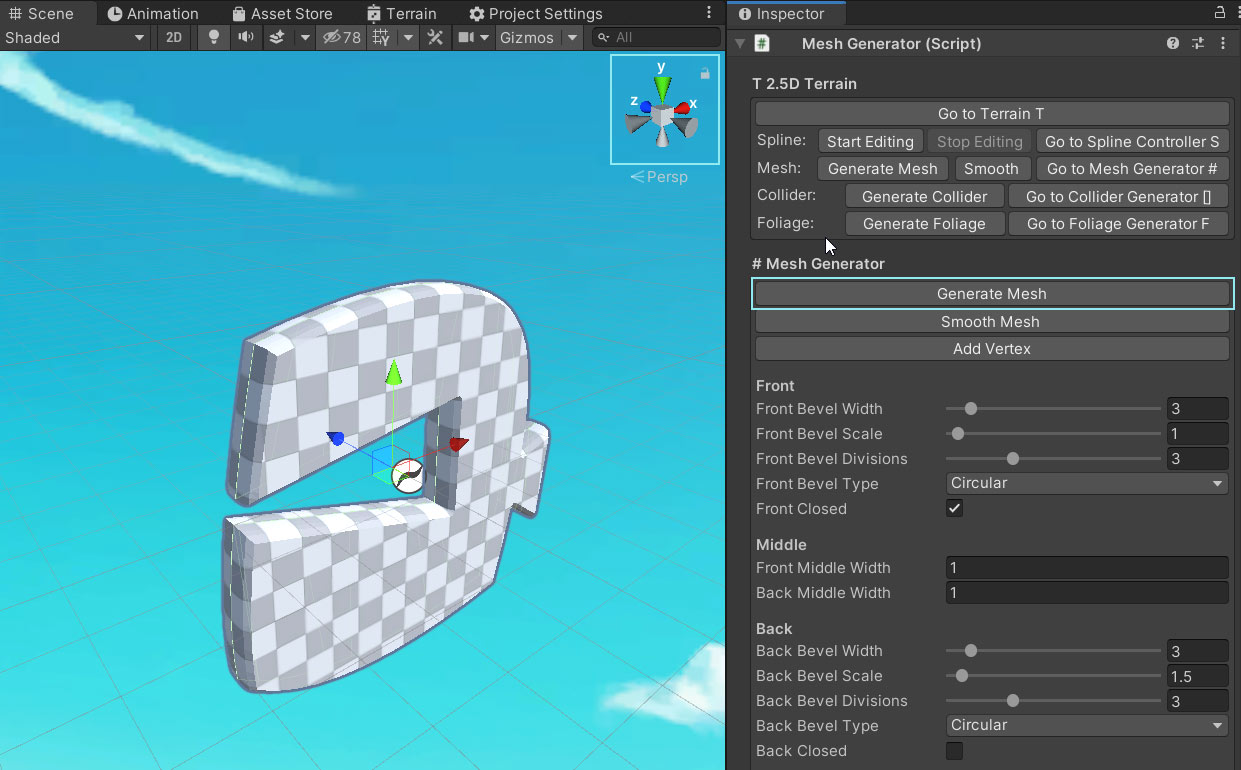
It is best to just play around wit the options and see what they do.
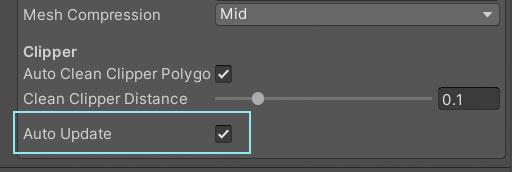
To see the changes immediately you can enable the 'Auto Update' option.
NOTICE that this setting will force the Mesh Generator to ignore the Smoothing and Erosion settings due to performance reasons (it's just too slow with those turned on).
 Below you will find more details on some of the more complex options.
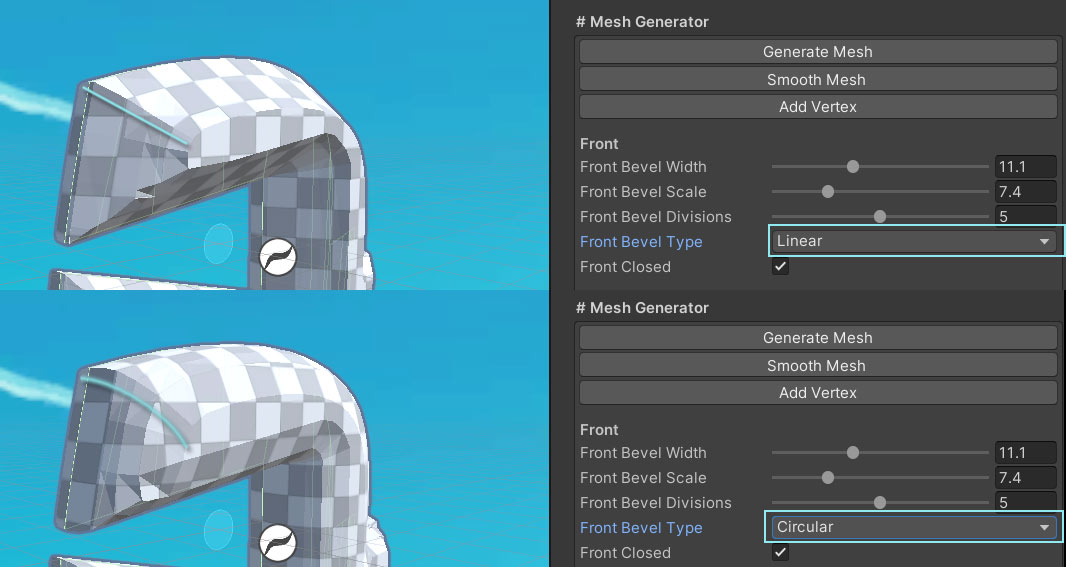
Bevel
The bevel type defines how the edge is shrunk during extrusion. Using the circular bevel in combination with 'Bevel Scale' and 'Bevel Width' can create a nice range of different shapes.
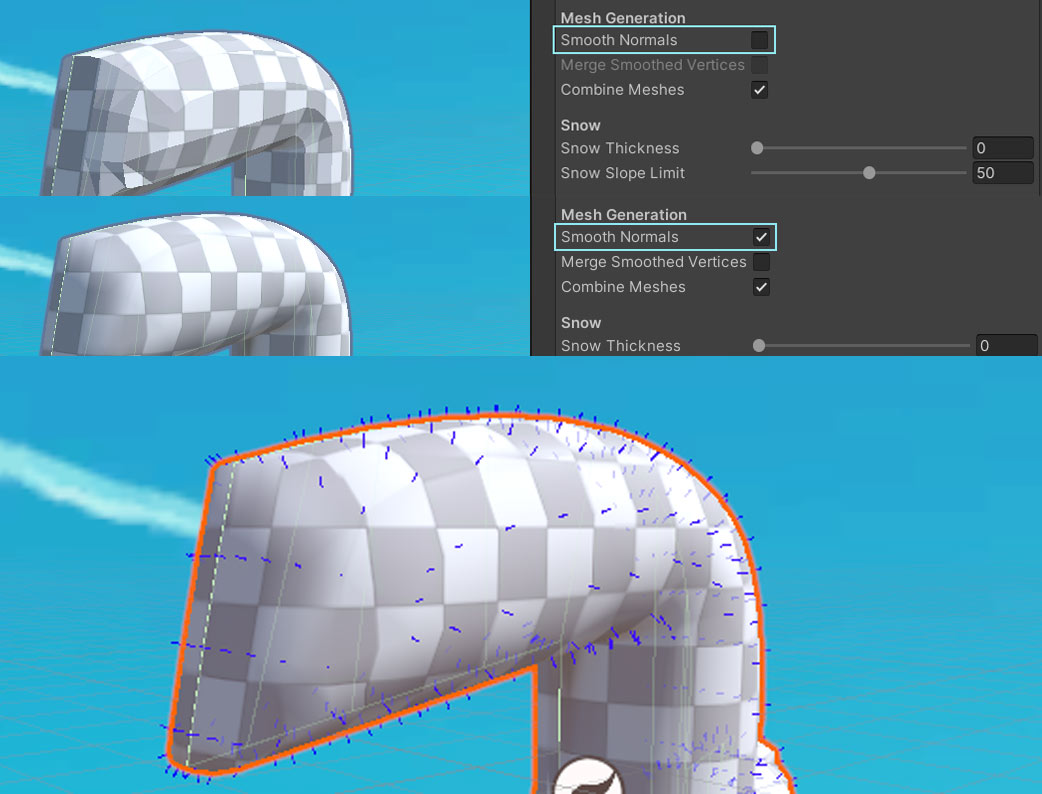
Smoothing
Smoothing will soften the edges by averaging the normals. Very few polygons, but still a smooth look!
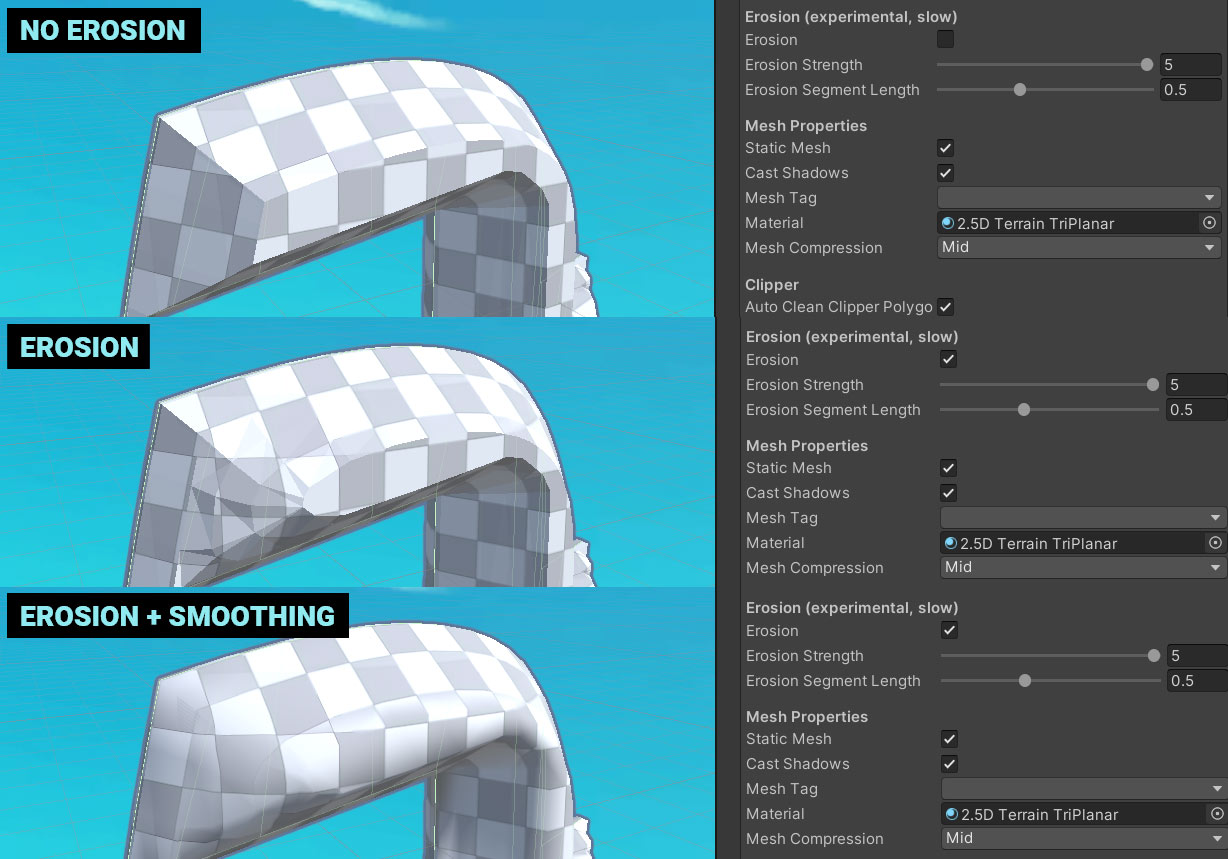
Erosion
Erosion will soften hard edges and makes the mesh look more organic (and chaotic). It's a subtle change. Best used in combination with smoothing.
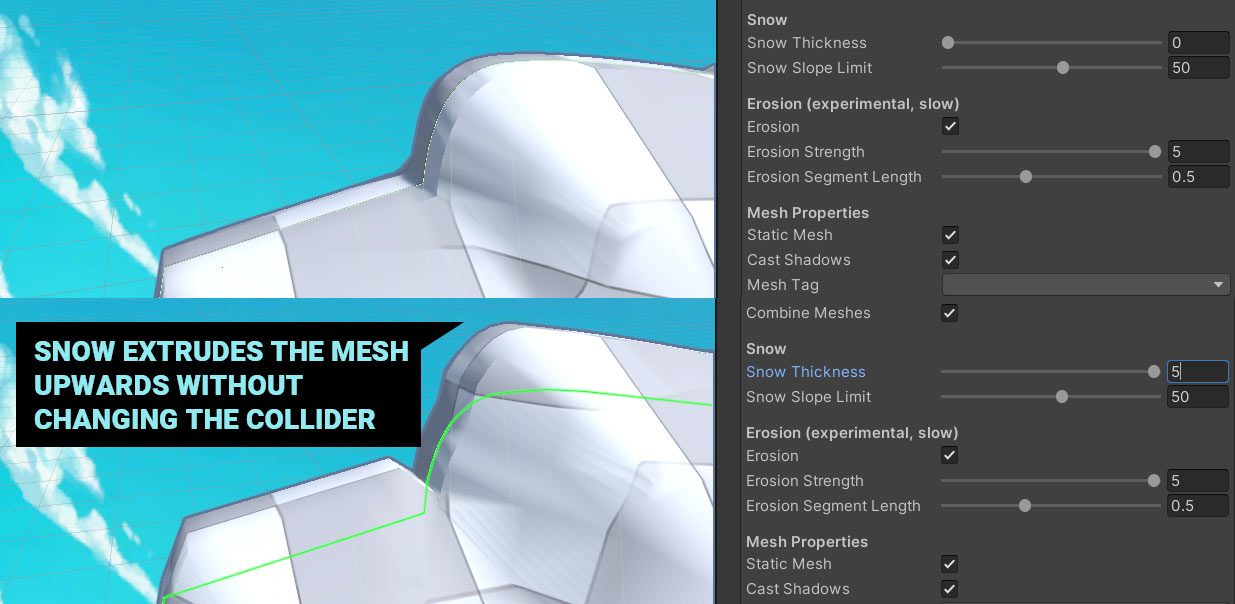
Snow
Snow extrudes the mesh upwards without changing the collider. It also does this only at flat parts of the terrain. Just like real snow.
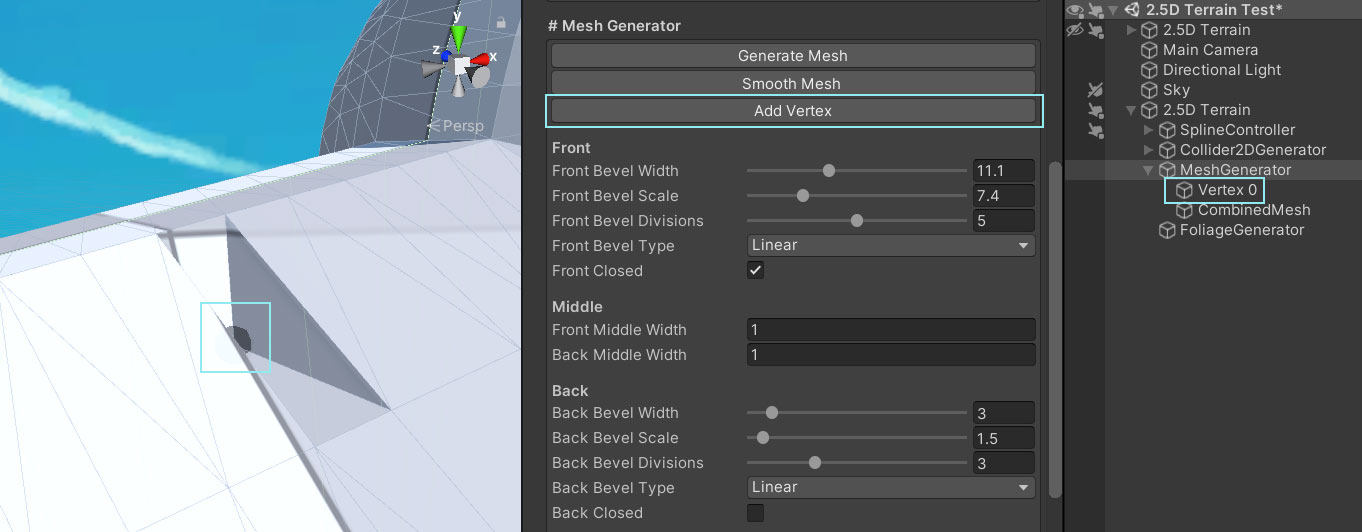
Custom vertices
Sometimes you may have the need for one additional vertex just at the right spot. You can add one with 'Add Vertex'. Though it's no replacement for a real modelling tool.
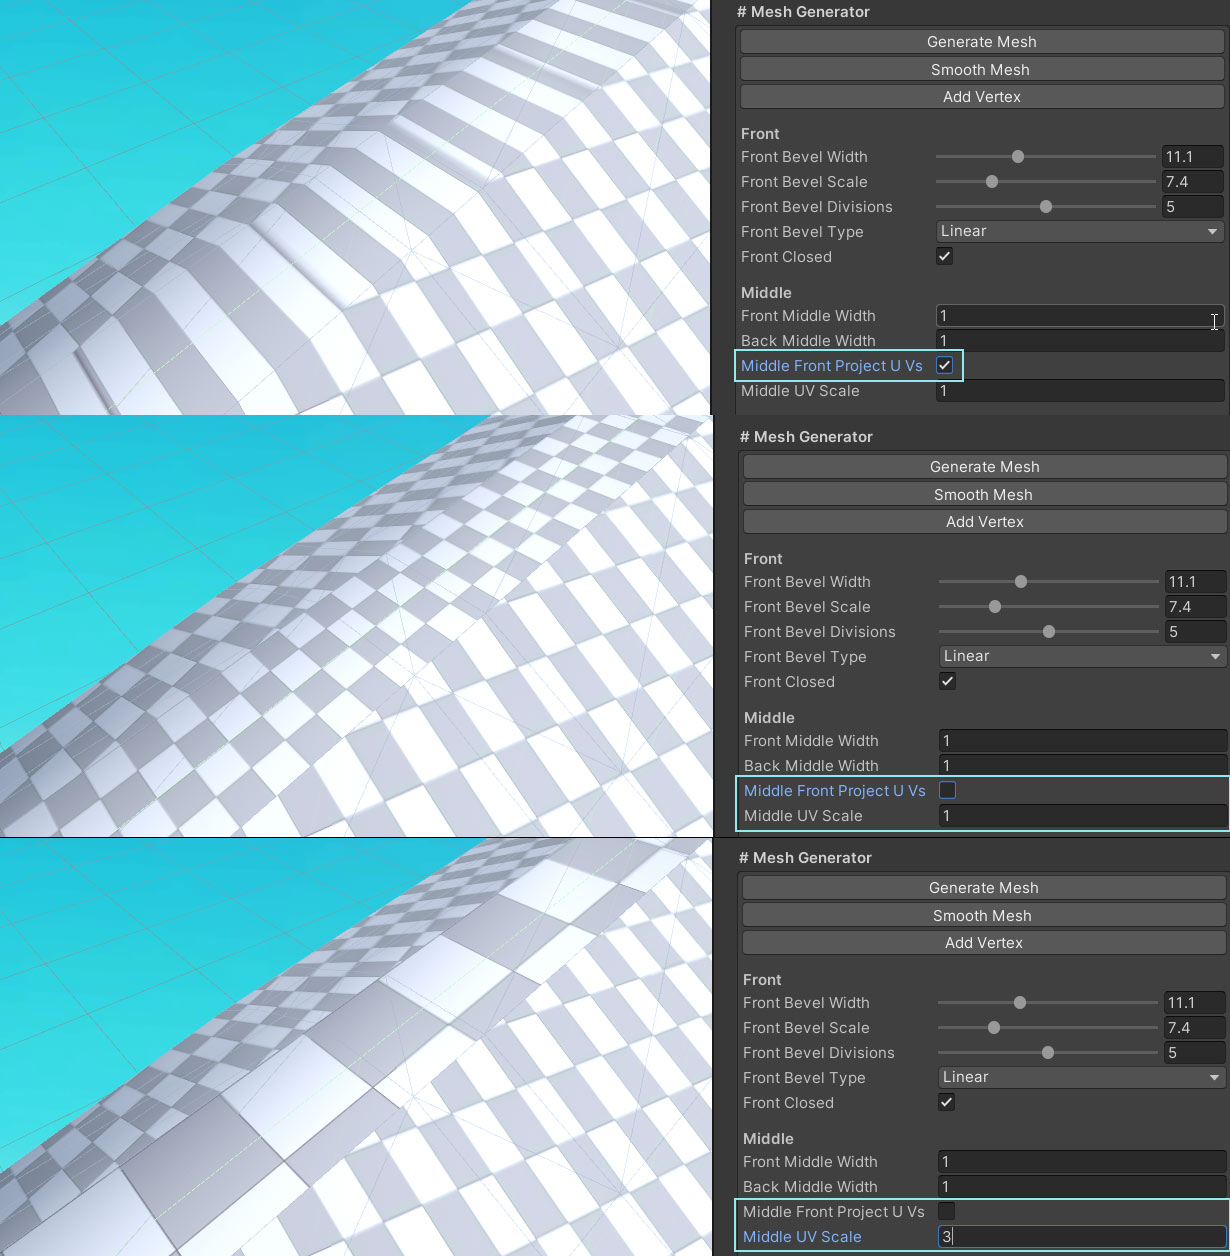
UV layouts
The meshes are meant for using a TriPlanar shader (there is a TriPlanar ShaderGraph shader included).
However, there are some UVs generated for the mesh. The UV layout of the front and back parts is always a simple projection along the z-axis. For the middle part you can choose whether to also use the projection or to generate custom UVs.
Foliage Generator
The Foliage Generator requires a mesh to work. Usually that's the one provided by the Mesh Generator. It does a series of ray casts from top to bottom and wherever a ray hits the mesh it might place an object (instantiate a prefab).
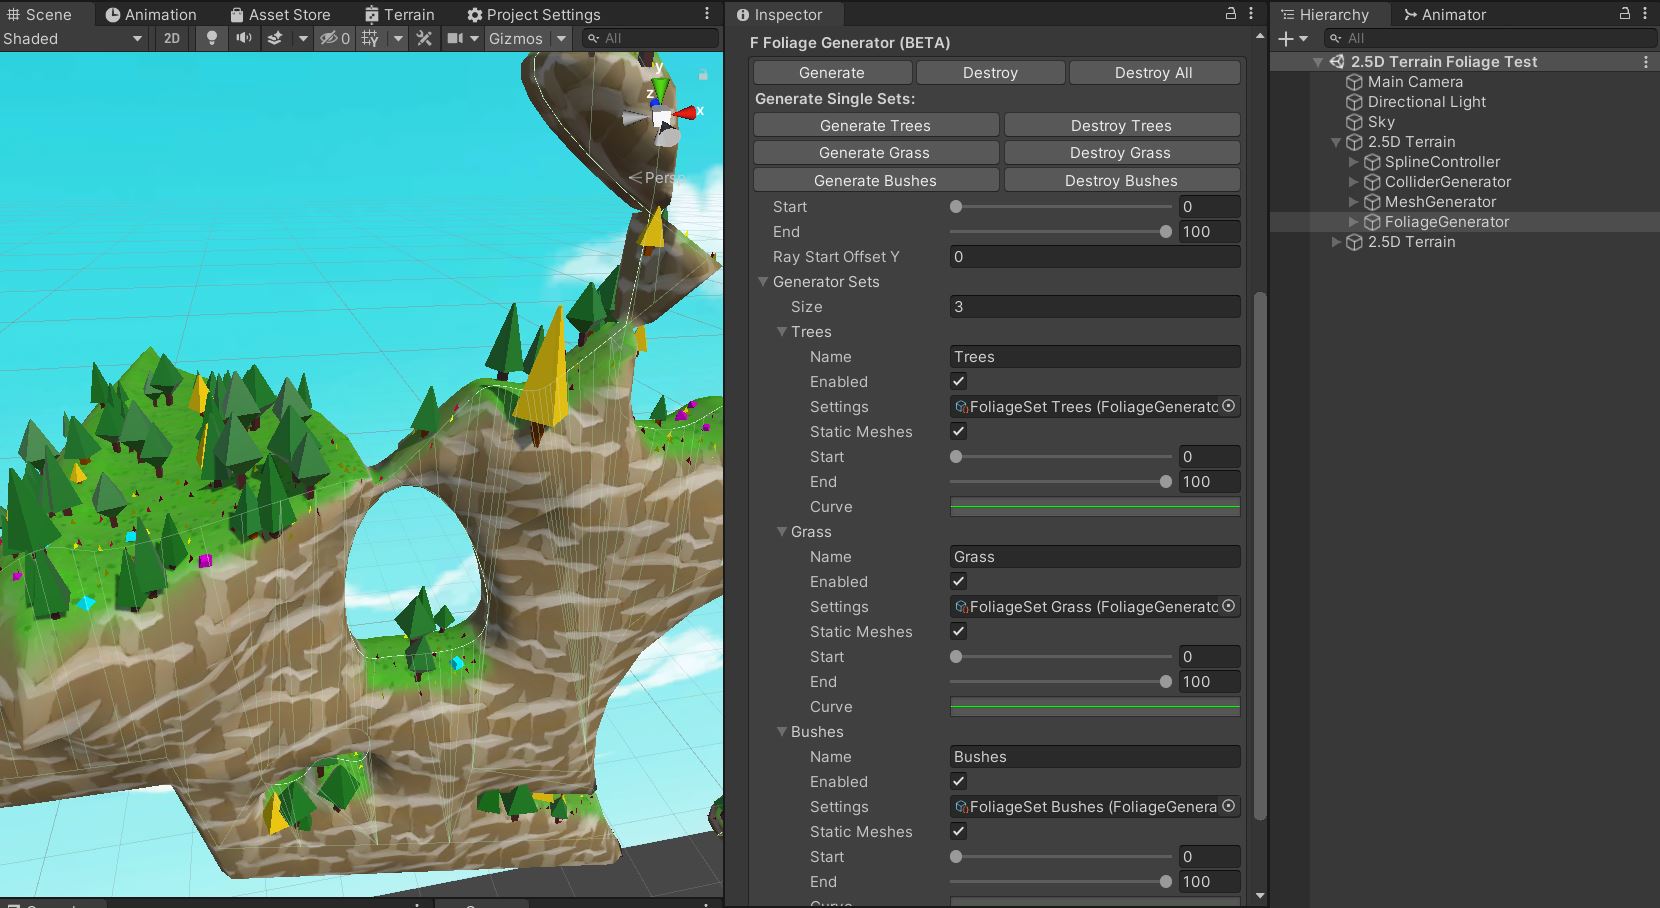
 If you want a quick start on the Foliage Generator you can open the "2.5D Terrain Foliage Test" scene located under "Plugins/Terrain25D/Examples/Foliage". It contains a fully configured Foliage Generator with three sets (trees, grass, bushes), prefabs, materials and textures.
Step by Step Guide
This guide assumes you have completed the 'Mesh Controller' guide first.
Before we begin let's quickly change the material of the mesh to something more pleasing. Open the Mesh Generator and select the '2.5D Terrain TriPlanar Rock Grass' Material.
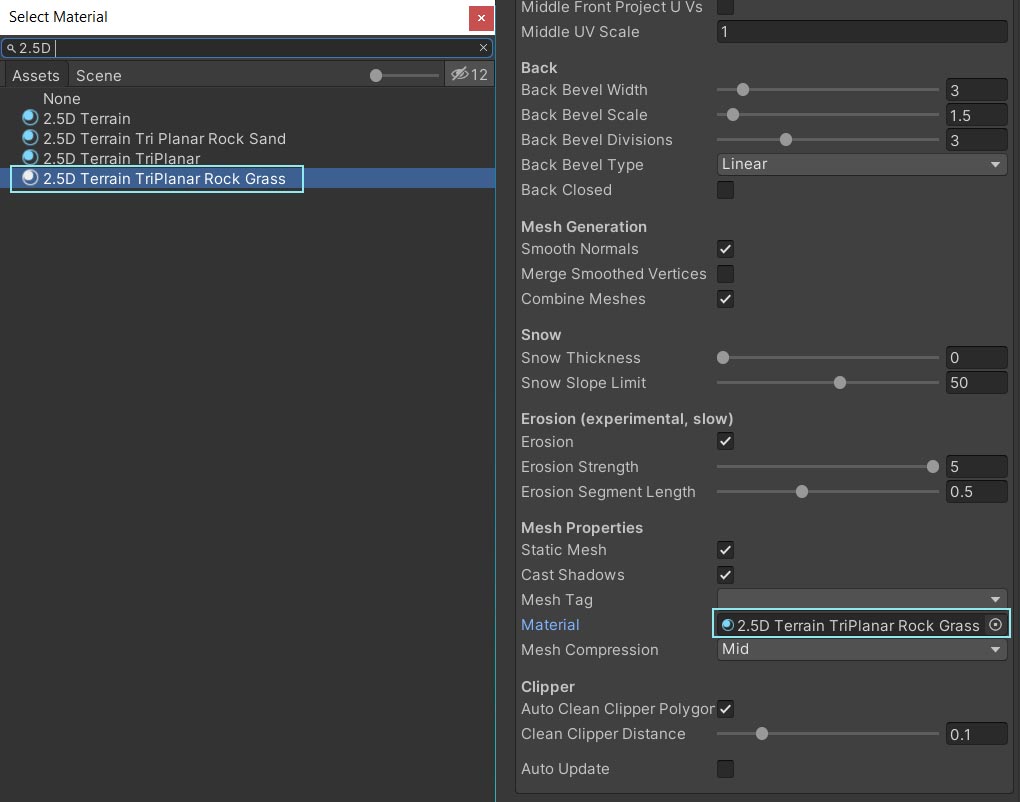 Then generate the mesh again with the new material assigned.
 Probably your artists will do a better job with nice textures than me :D
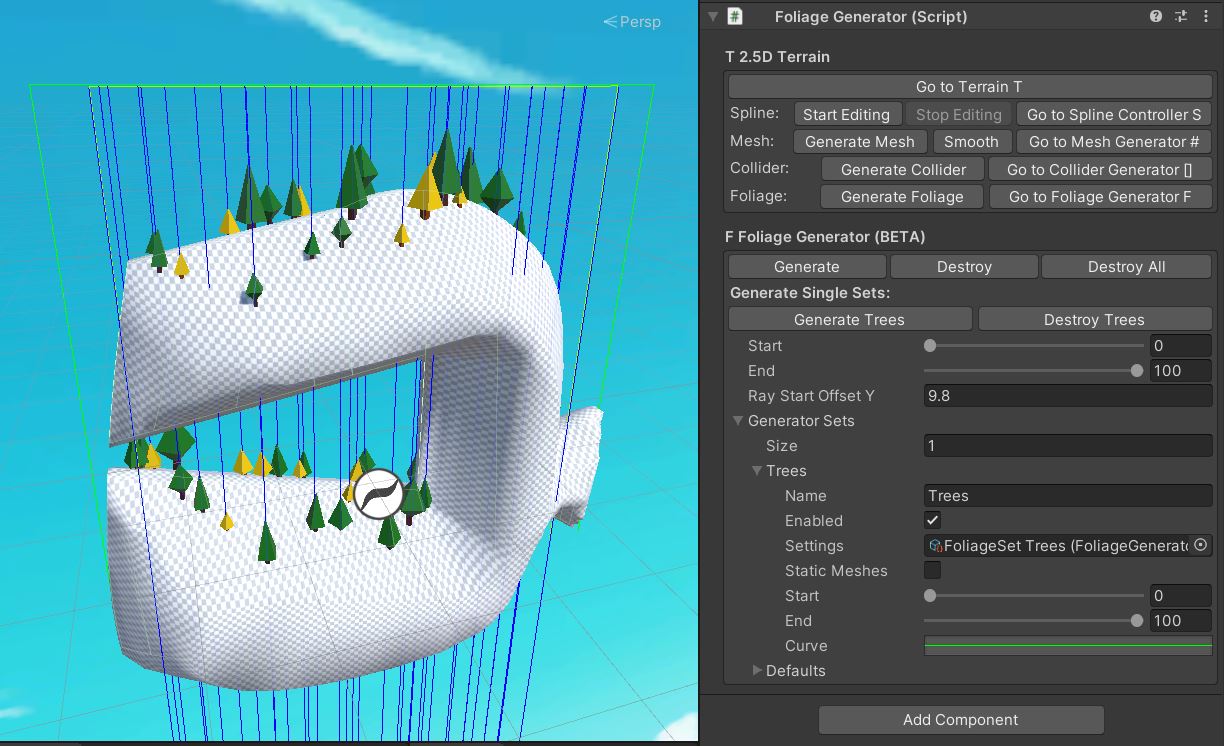
To open the Foliage Generator select the 2.5D Terrain and hit 'Go to Foliage Generator'.
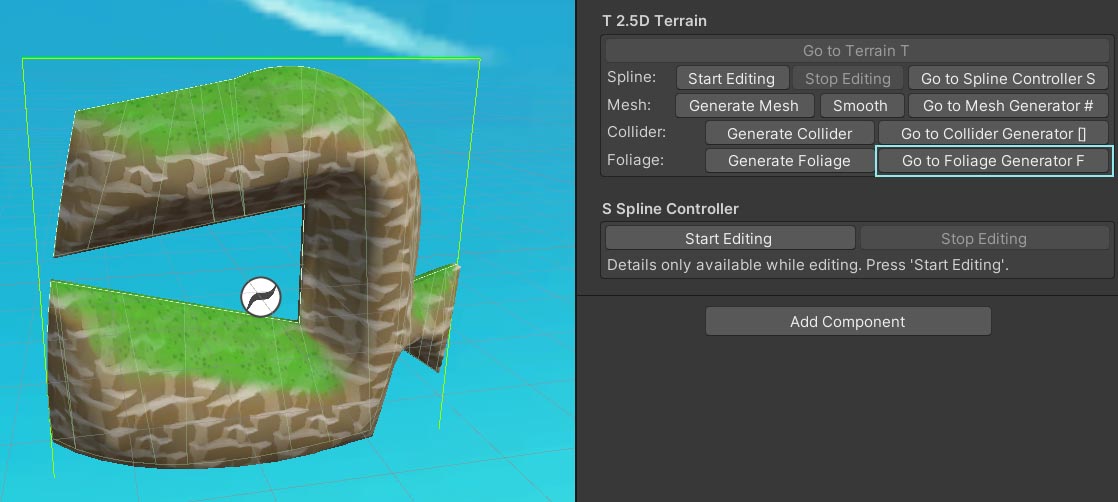
The foliage is generated based on rules. You need to tell it how many objects you want to spawn, where to spawn them, which objects (prefabs) and materials to use, ... .
All these settings are bundled together in a 'Generator Set'. There can be multiple sets used in the Foliage Generator. For example you may have one set for trees and one for bushes and another for grass.
You probably also want to be able to reuse these sets across multiple terrains. That's why most of the settings within a set are store in a file called 'FoliageSet Settings'. Each set has a reference to one settings file.
Here is the dependency graph:
Foliage Generator > requires > Generator Sets > requires > FoliageSet Setting
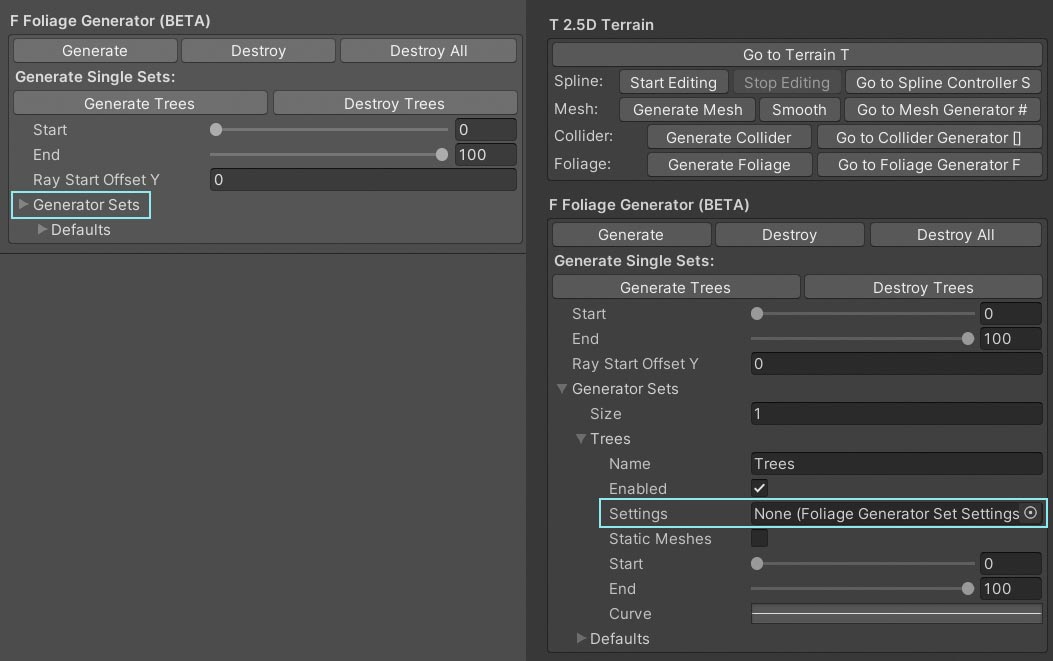
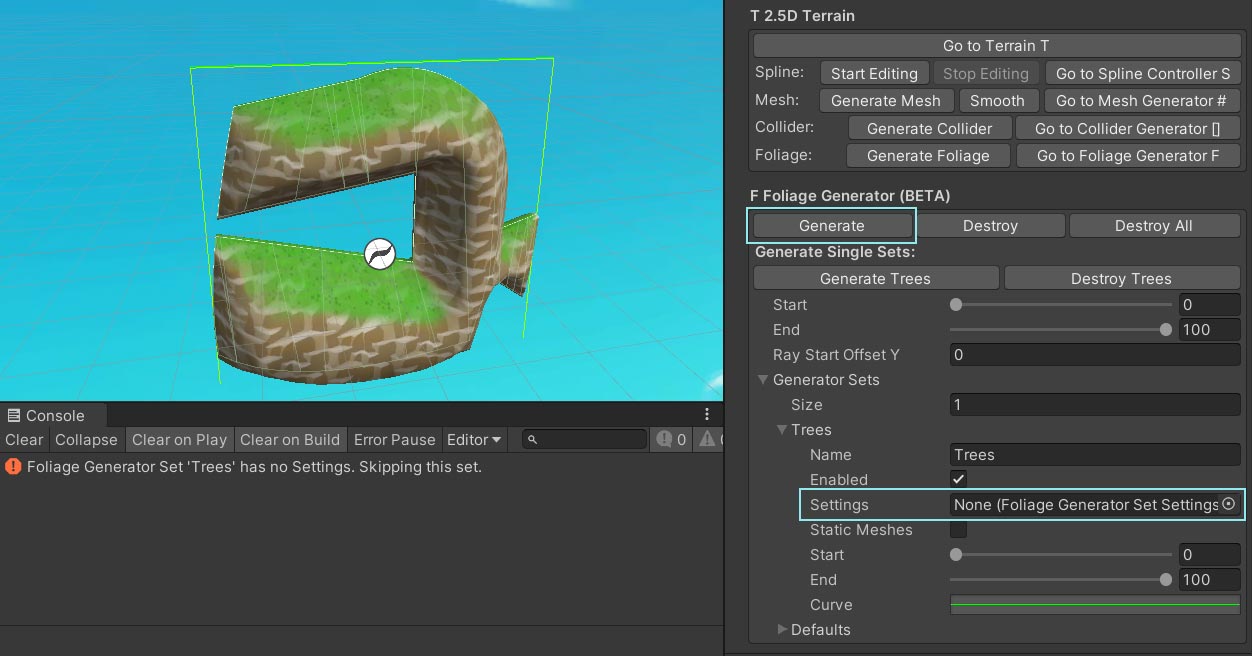
By default a set called 'Trees' is added to the generator. BUT this set does not yet have a setting linked to it. That's why will see an error if you hit the 'Generate Foliage' button.
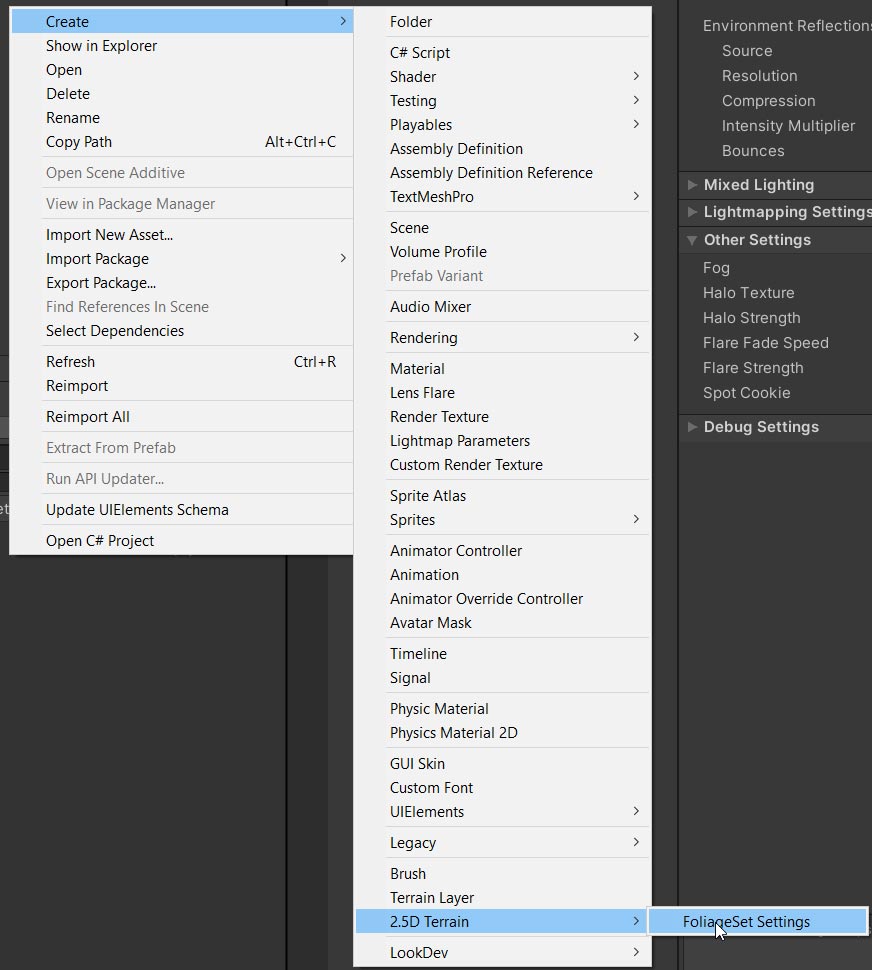
Create a new 'Foliage Set Setting' by going to Assets > Create > 2.5D Terrain > FoliageSet Settings.
 Go back to the Foliage Generator.
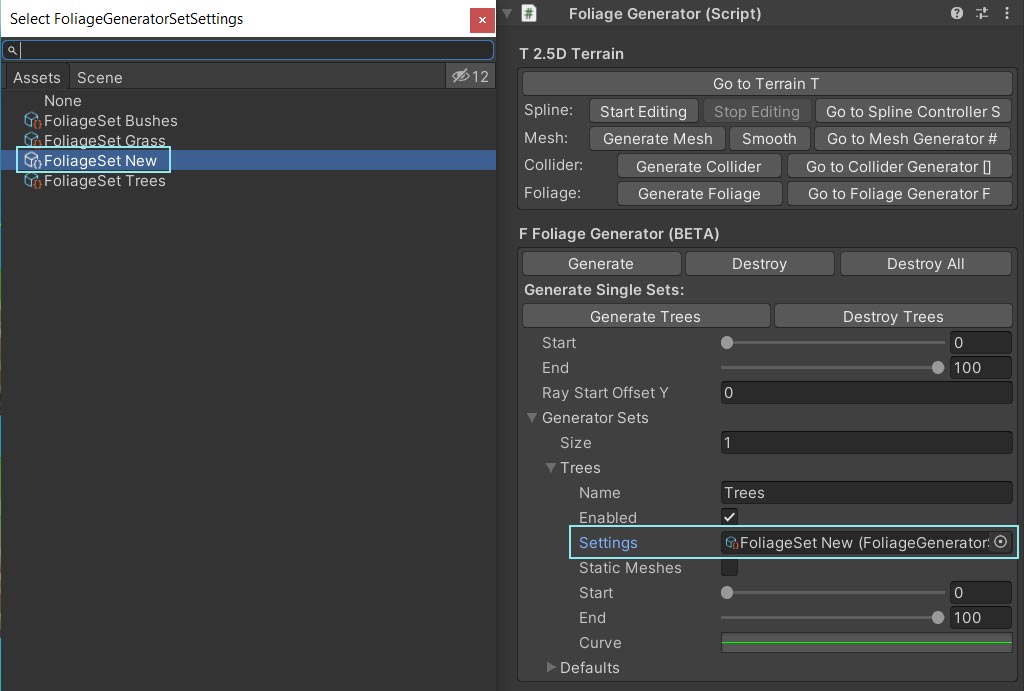
 Assign it to the Generator Set in your Foliage Generator.
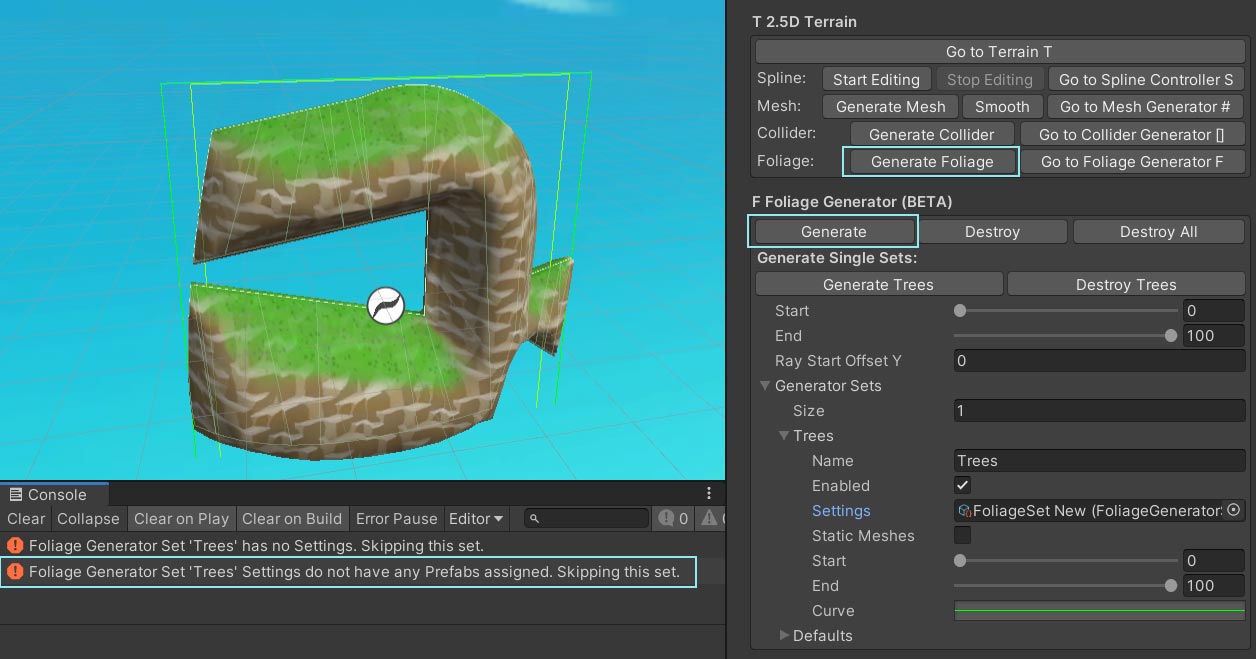
Now if you press 'Generate Foliage' you will get ... another error?
Well, you have created settings for your foliage set BUT you have not yet assigned any Prefabs to it. Therefore the Foliage Generator does not know which objects to spawn and skips the set.
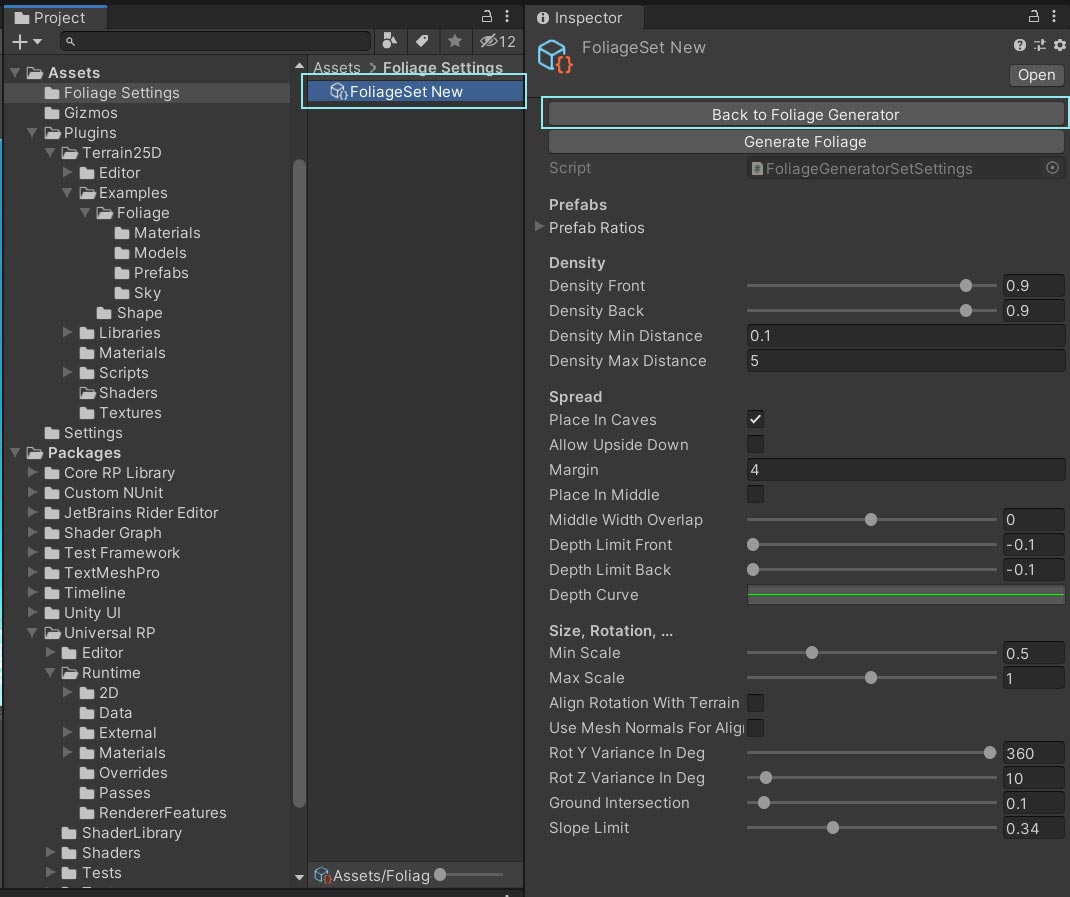
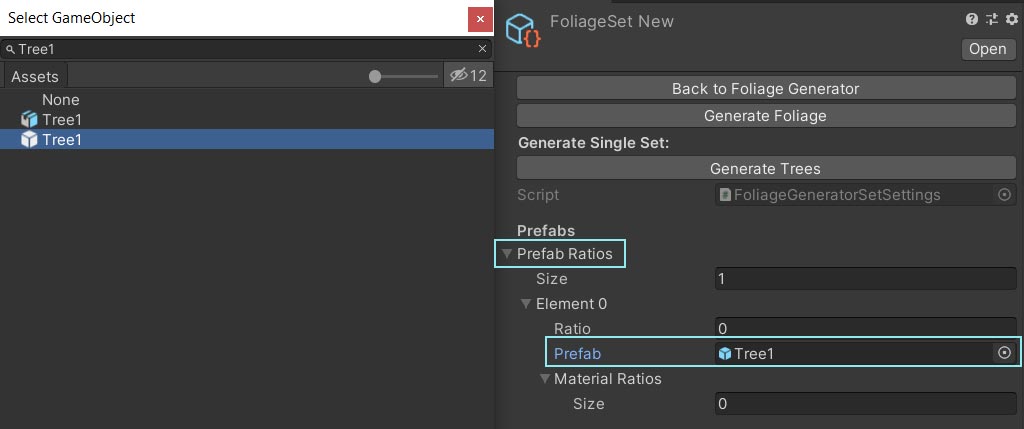
In order to add some Prefabs to the settings you need to open the settings (double click on the setting in the Generator Set).
Add a prefab to the 'Prefab Ratios'. You can use the 'Tree1' from the examples here.
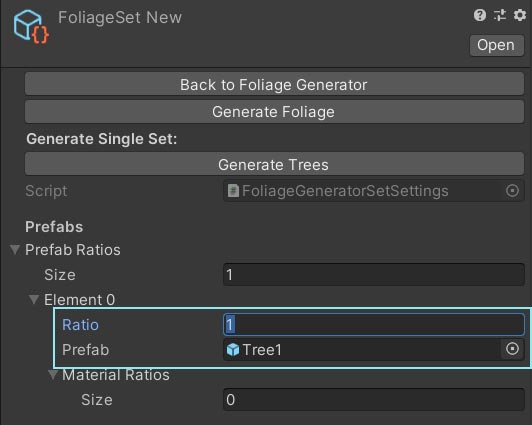
 Also, don't forget to specify the ratio. It should be 1 in most cases. The ratio defines how often a prefab is used compared to other prefabs in the list.
 You can also specify a Material (and ratios for those) which will be applied to the prefab. Leave it empty for now.
Finally the 'Generate Trees' button works.
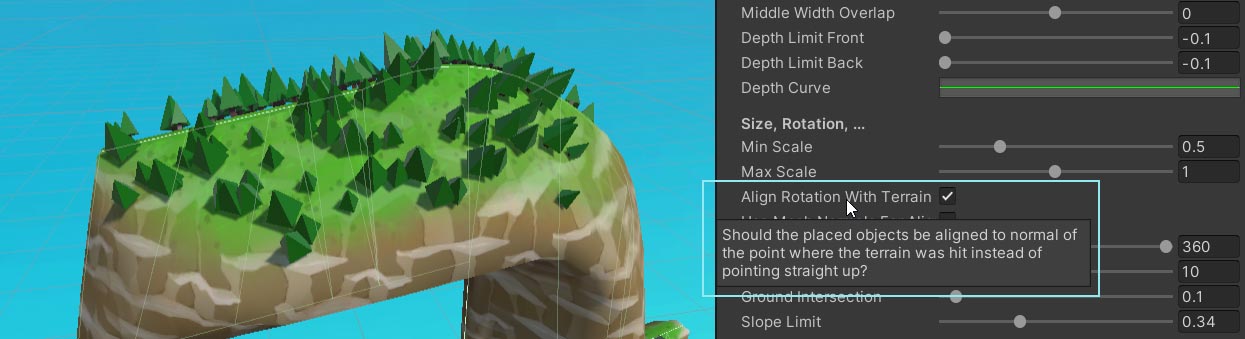
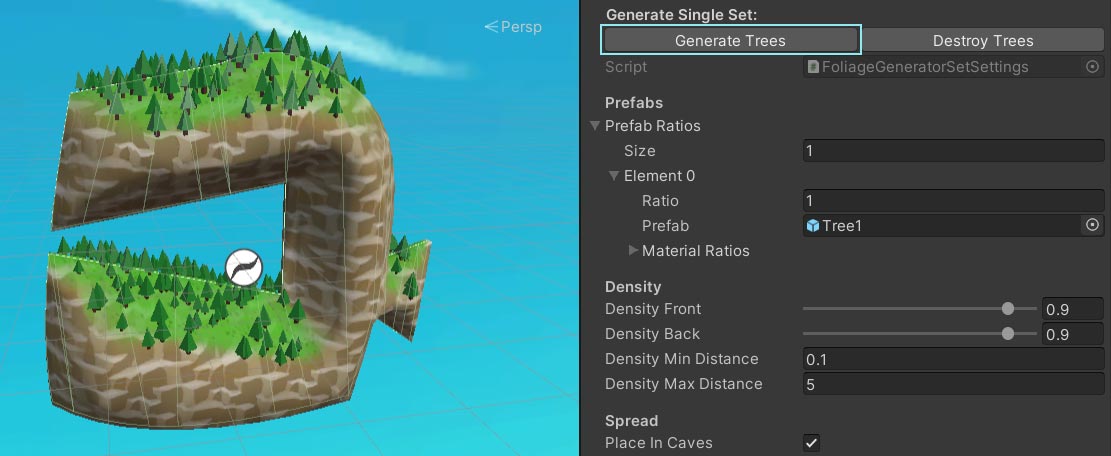 Now you can play around with the settings. Remember: each option has a tooltip. Hover over it and read it.
If you want to investigate a more complex setup then you can open the "2.5D Terrain Foliage Test" scene located under "Plugins/Terrain25D/Examples/Foliage". It contains a fully configured Foliage Generator with three sets (trees, grass, bushes), prefabs, materials and textures.
That's it. Phew. Thanks for reading it all.
If you have any questions then please post them in the Unity Forum. This way others can also learn from the discussion.
Thank you :-)
Licenses
This Asset contains some open source libraries. Please check the LICENSE or README files in the Libraries folder after download.
Licenses used:
- ClipperLib: Boost Software License - Version 1.0
- CurveShortening: https://github.com/acarapetis/curve-shortening-demo, c# port KAMGAM e.U.
- FarseerUnity: Microsoft Permissive License (Ms-PL)
- Poly2Tri: http://code.google.com/p/poly2tri/
- PolygonMesh2D: MIT License
All other Code and Assets are (if not specified differently):
Copyright (C) 2022 KAMGAM e.U. - All rights reserved
The code can only be used under the standard Unity Asset Store
End User License Agreement. A Copy of the EULA APPENDIX 1 is available at https://unity3d.com/company/legal/as_terms
I publish this plugin with full source code because as a developer
I know how annoying it is to not have source code access. If you
like it then please remind others to purchase the plugin. Don't
just copy and paste it everywhere.
Thank you